Recently, I worked on an application that included a Blazor Server frontend and an ASP.NET API. A key requirement was to implement Azure Active Directory single sign-on (SSO) authentication and authorization based on App Roles.
Typically, you might set up two separate app registrations in Azure AD: one for the Blazor Server and another for the API. However, in this scenario, the client desired a single point for managing users and roles. To summarize, both the Blazor Server and the API needed to utilize the same app registration for streamlined management.
In this post we will look at how to implement this. The code can be found here.
Pre-requisites
- Visual Studio 2022 or VS Code
- .NET 8.0 SDK
- Microsoft 365 tenant
Create and configure an Azure Entra app registration
To start we need to create an app registration in Azure Entra. To do this go to the Azure portal and select Azure Entra ID. Next select App registrations and click on New registration. Give the app a name and select Accounts in this organizational directory only for Supported account types. For the Redirect URI select Web and enter the following URL https://localhost:5001/signin-oidc. Please note this can be different in your instance! Click on Register to create the app registration.
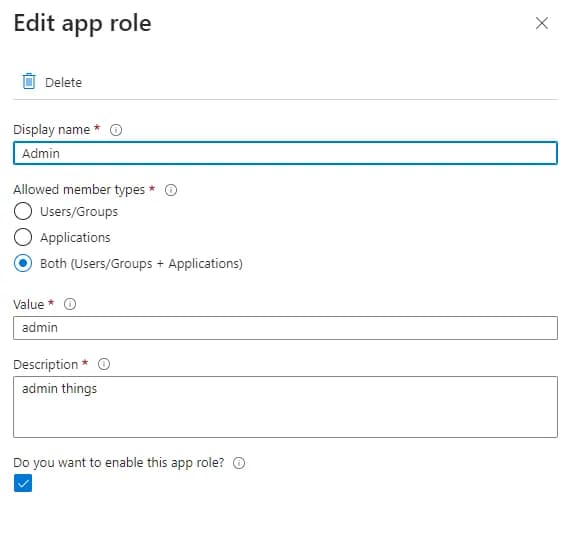
To be able to use the app roles we need to add them to the manifest. To do this we need to create a custom role. To do this go to the Azure Entra app registration that you created in the previous step and select App roles. Click on Create app role.
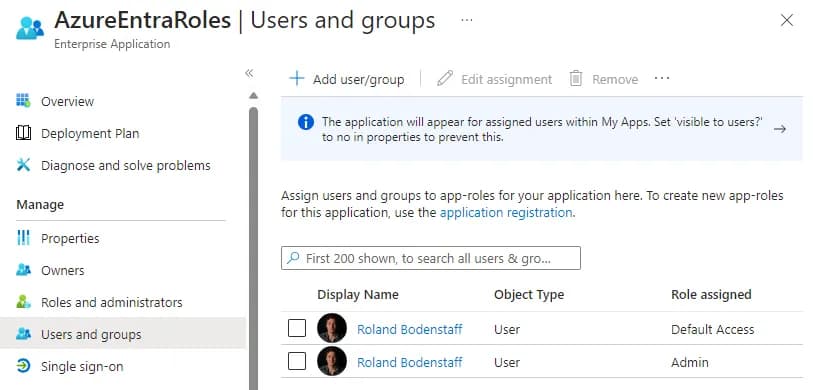
Don’t forget to add yourself to the newly created role in the associated Enterprise application in Azure Entra.
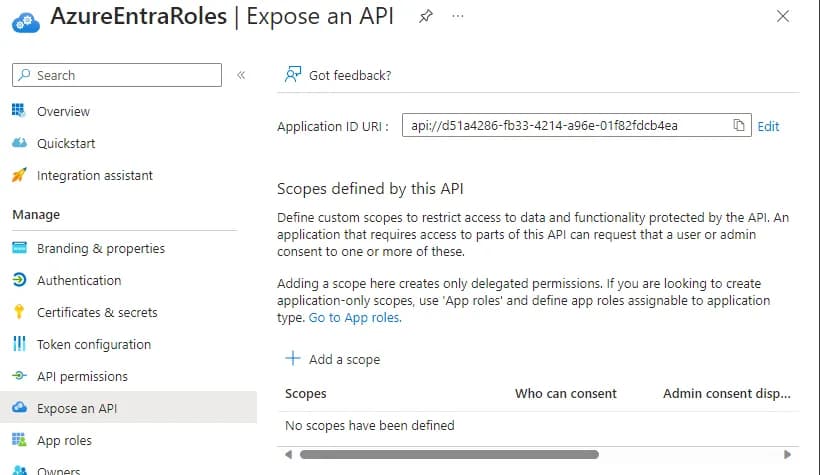
The next step is to go to Expose an API. Here set the Application ID URI to the same value as the Client ID which is the default. This is the value that will be used when we want to retrieve a token for the API. For this simple application we don’t need to add any scopes.
Create a Blazor Server application
Now that we have created the app registration we can create the Blazor Server application. Open a terminal and run the following commands:
dotnet new blazorserver -o Frontend
cd Frontend
dotnet add package Microsoft.Identity.Web
dotnet add package Microsoft.Identity.Web.UI
dotnet add package Microsoft.Identity.Web.DownstreamApi
dotnet dev-certs https --trust
Now that the Frontend project is created we need to configure it to use Azure Entra authentication. To do set the following values in the appsettings.json file.
{
  "AzureAd": {
    "Instance": "https://login.microsoftonline.com/",
    "Domain": "Enter the domain here",
    "TenantId": "Enter the tenant ID here",
    "ClientId": "Enter the client ID here",
    "ClientSecret": "Enter the client secret here",
    "CallbackPath": "/signin-oidc"
  },
  "DownstreamApi": {
    "BaseUrl": "Enter location of the API here",
    "Scopes": ["Enter the client ID here/.default"]
  },
  "Logging": {
    "LogLevel": {
      "Default": "Information",
      "Microsoft.AspNetCore": "Warning"
    }
  },
  "AllowedHosts": "*"
}
Note the Scopes value. Because we are using the same app registration for both the Blazor Server and the API we need to exclude the normal api:// prefix. This will give us a access token with the Role claim in it to send to the Api.
After that we need to setup the authentication in the Program.cs file. To do this replace everything with the following code.
using Microsoft.Identity.Web;
using Microsoft.Identity.Web.UI;

var builder = WebApplication.CreateBuilder(args);

var initialScopes = builder.Configuration["DownstreamApi:Scopes"]?.Split(' ');

builder.Services.AddMicrosoftIdentityWebAppAuthentication(builder.Configuration, "AzureAd")
    //These are the scopes that the application will request access to
    .EnableTokenAcquisitionToCallDownstreamApi(initialScopes)
    //This will add an IDownStreamApi instance to the DI container
    .AddDownstreamApi("DownstreamApi", builder.Configuration.GetSection("DownstreamApi"))
    .AddInMemoryTokenCaches();

//This will add the views and controllers for the account authentication
builder.Services.AddControllersWithViews()
    .AddMicrosoftIdentityUI();

builder.Services.AddAuthorization(options =>
{
    // By default, all incoming requests will be authorized according to the default policy
    options.FallbackPolicy = options.DefaultPolicy;
});

builder.Services.AddRazorPages();
builder.Services.AddServerSideBlazor()
    .AddMicrosoftIdentityConsentHandler();

var app = builder.Build();

app.UseHttpsRedirection();

app.UseStaticFiles();

app.UseRouting();

app.MapControllers();
app.MapBlazorHub();
app.MapFallbackToPage("/_Host");

app.Run();
Create an Asp.NET API
Now to create a Asp.Net Api. Open a terminal and run the following commands.
dotnet new webapi -o Api
cd Api
dotnet add package Microsoft.Identity.Web
dotnet dev-certs https --trust
After creating the API we need to configure it to use Azure Entra authentication. To do set the following values in the appsettings.json file.
{
  "AzureAd": {
    "Instance": "https://login.microsoftonline.com/",
    "ClientId": "Enter the client ID here",
    "TenantId": "Enter the tenant ID here"
  },
  "Logging": {
    "LogLevel": {
      "Default": "Information",
      "Microsoft.AspNetCore": "Warning"
    }
  },
  "AllowedHosts": "*"
}
Next we need to configure the API to use Azure Entra authentication. To do this open the Program.cs file and replace everything with the following code.
using Microsoft.AspNetCore.Authentication.JwtBearer;
using Microsoft.Identity.Web;

var builder = WebApplication.CreateBuilder(args);

builder.Services.AddAuthentication(JwtBearerDefaults.AuthenticationScheme)
        .AddMicrosoftIdentityWebApi(options =>
        {
            builder.Configuration.Bind("AzureAd", options);
            options.TokenValidationParameters.NameClaimType = "name";
        }, options => { builder.Configuration.Bind("AzureAd", options); });

builder.Services.AddAuthorization();

var app = builder.Build();

app.UseHttpsRedirection();

app.UseAuthorization();

app.MapGet("roles/admin", () => "You are an admin!")
    .RequireAuthorization(a => a.RequireRole("admin"));

app.Run();
As you can see we have one endpoint. That endpoint is only accessible for users with the admin role.
Connect the Blazor Server application to the API

Now that everything is in place the last thing we need to do is call the API from the frontend. In any Razor component, I picked the Index.razor, you want add the following code:
@page "/"
@using Microsoft.Identity.Abstractions
@using Microsoft.Identity.Client
@using Microsoft.Identity.Web
@using System.Text.Json

@inject MicrosoftIdentityConsentAndConditionalAccessHandler ConsentHandler
@inject IDownstreamApi downstreamApi;

<PageTitle>Index</PageTitle>

<AuthorizeView Roles="admin">
    <Authorized>
        <p>You're an admin!</p>
        <pre>@_content</pre>
    </Authorized>
    <NotAuthorized>
        <p>You're not an admin.</p>
    </NotAuthorized>
</AuthorizeView>

@code {
    private string _content = string.Empty;
    protected override async Task OnInitializedAsync()
    {
        try
        {
            await CallApi();
        }
        catch (Exception ex)
        {
            ConsentHandler.HandleException(ex);
        }
    }

    private async Task CallApi()
    {
        var response = await downstreamApi.CallApiForUserAsync("DownstreamApi", request =>
        {
            request.HttpMethod = HttpMethod.Get.ToString();
            request.RelativePath = "roles/admin";
        });
        _content = await response.Content.ReadAsStringAsync();
    }
}
As you can see you can use the standard AuthorizeView component to show different content based on the users role. In this case we are calling the API and showing the response.
The consent handler is used to handle the consent and scope request when needed.
Conclusion
In this post we looked at how to use Azure Entra to authenticate users and use roles to authorize them in a Blazor Server application and also use these roles in an API. The code can be found here.