Introduction
At InSpark all of the Copilots of Microsoft are hot topics. Personally I had only used Github Copilot and I was a big fan. I’m always looking for ways to use it in my daily work.
While working I suddenly got a notification that I was assigned a 365 Copilot license. As a developer I was immediately curious about what I could do with it. I started to explore the possibilities but I quickly found that the default capabilities where not worth the price in my honest opinion. Sure it’s handy to let it summarize a 2 week long e-mail thread or chat but not enough to actually start using it during my every day tasks. We have all seen the demos but in reality it’s not that exciting.

But then…
I found out that 365 Copilot can also be extended with custom plugins! So of course I jumped into Visual Studio and started to build my first plugin. In this post I’ll show you how to build your own custom plugin for Copilot. We’ll use the OpenAPI specification of an API to generate a custom plugin that can be used in Copilot. It’s easier than you think so let’s get started!

Prerequisites
Before we start, make sure you have the following tools/licenses:
- .NET 8 SDK or higher
- Visual Studio 2022 Preview with Teams development tools
- Teams client
- 365 Copilot license (you can also request a developer tenant from Microsoft for this)
Create a new project
Microsoft has made is easy for us to quickly get started by using the Microsoft Teams App template in Visual Studio. This template will create a new project with all the necessary files and configurations to get started.
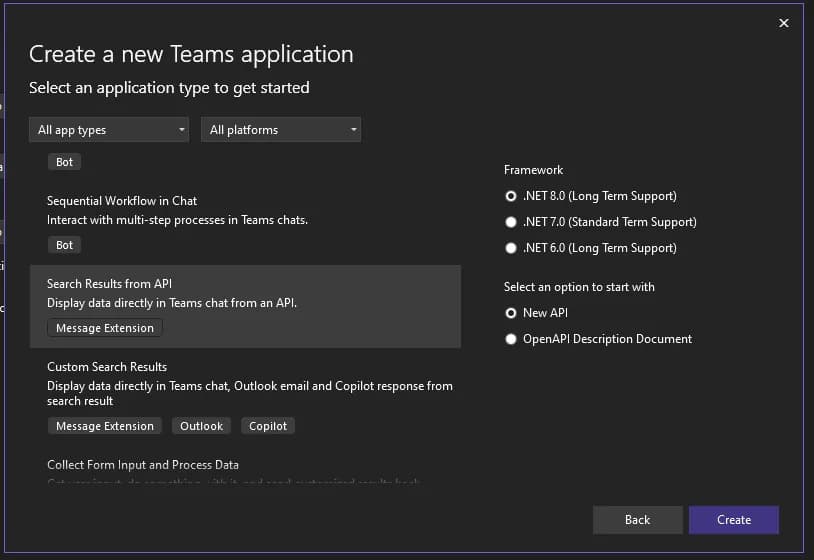
This will create a Function App project with all the Teams configurations already set up.
Exploring the project
Before we continue let’s take a look at the project structure. The project consists of a Function App project and a Teams app package folder. The Function App project contains a single function.
Repair.cs
[Function("repair")]
public async Task<HttpResponseData> RunAsync([HttpTrigger(AuthorizationLevel.Anonymous, "get")] HttpRequestData req)
{
    // Log that the HTTP trigger function received a request.
    _logger.LogInformation("C# HTTP trigger function processed a request.");

    // Get the query parameters from the request.
    string assignedTo = req.Query["assignedTo"];

    // Get the repair records.
    var repairRecords = RepairData.GetRepairs();

    // Filter the repair records by the assignedTo query parameter.
    var repairs = repairRecords.Where(r =>
    {
        // Split assignedTo into firstName and lastName
        var parts = r.AssignedTo.Split(' ');

        // Check if the assignedTo query parameter matches the repair record's assignedTo value, or the repair record's firstName or lastName.
        return r.AssignedTo.Equals(assignedTo?.Trim(), StringComparison.InvariantCultureIgnoreCase) ||
               parts[0].Equals(assignedTo?.Trim(), StringComparison.InvariantCultureIgnoreCase) ||
               parts[1].Equals(assignedTo?.Trim(), StringComparison.InvariantCultureIgnoreCase);
    });

    // Return filtered repair records, or an empty array if no records were found.
    var response = req.CreateResponse();
    await response.WriteAsJsonAsync(new { results = repairs });
    return response;
}
As you can see the function is a simple HTTP trigger that returns a list of repair records that where assigned to a mechanic. You will also see that there is not a single reference to Copilot in this function. That’s the cool part about the way Copilot plugins work. We can use any API as long as we provide the OpenAPI specification to Copilot.
OpenAPI specification
The last important thing we will look at is the OpenAPI specification file. This file is used by Copilot to understand what our API can do. The file contains a list of endpoints and their request/response types. This is how Copilot knows what to call when a user provides a prompt. The OpenAPI specification file can be found in:
appPackage/apiSpecificationFile/repair.yaml
openapi: 3.0.0
info:
  title: Repair Service
  description: A simple service to manage repairs
  version: 1.0.0
servers:
  - url: ${{OPENAPI_SERVER_URL}}/api
    description: The repair api server
paths:
  /repair:
    get:
      operationId: repair
      summary: Search for repairs
      description: Search for repairs info with its details and image
      parameters:
        - name: assignedTo
          in: query
          description: Filter repairs by who they're assigned to
          schema:
            type: string
          required: false
      responses:
        "200":
          description: A list of repairs
          content:
            application/json:
              schema:
                type: array
                items:
                  properties:
                    id:
                      type: string
                      description: The unique identifier of the repair
                    title:
                      type: string
                      description: The short summary of the repair
                    description:
                      type: string
                      description: The detailed description of the repair
                    assignedTo:
                      type: string
                      description: The user who is responsible for the repair
                    date:
                      type: string
                      format: date-time
                      description: The date and time when the repair is scheduled or completed
                    image:
                      type: string
                      format: uri
                      description: The URL of the image of the item to be repaired or the repair process
What is really important here is that the parameters in the OpenAPI specification match the parameters in the function. This is how Copilot knows which parameter to use when calling the api. What is even more important than normal is that the descriptions of the operations, parameters and responses are clear and concise. When installing the plugin Copilot will remember these when a user provides a prompt.
Setup a dev tunnel
Because Copilot doesn’t run locally we need to setup a dev tunnel to expose our local environment to the internet. Visual Studio has a built-in feature to do this.
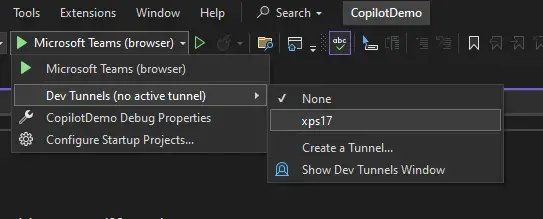
Prepare Teams toolkit dependencies
The Teams toolkit provides a way to quickly package a plugin and deploy it to your Teams client. Right click your project and select Teams Toolkit -> Prepare Teams App Dependencies.
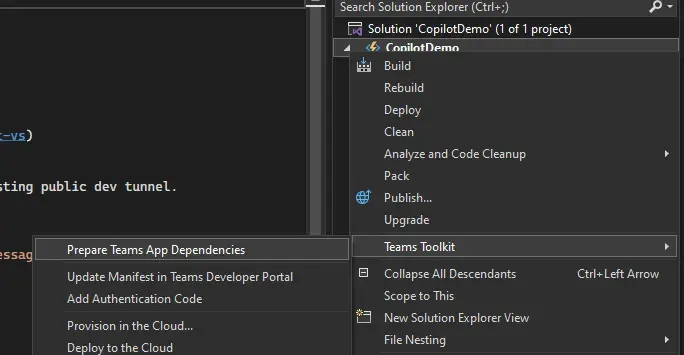
Following the steps in the wizard will install the necessary dependencies and configure your project to be ready for deployment. Make sure you have permissions to upload custom apps to your Teams client!
Testing the plugin
Now that we have everything set up we can start testing our plugin. Press F5 to start the project. This will start the Function App and open a new Teams client with the plugin loaded. Please note that I can take a few minutes for the plugin to show up in your Teams client. If that happens try to restart the project a couple of times.
Go to the 365 Copilot app in Teams and enable the plugin.
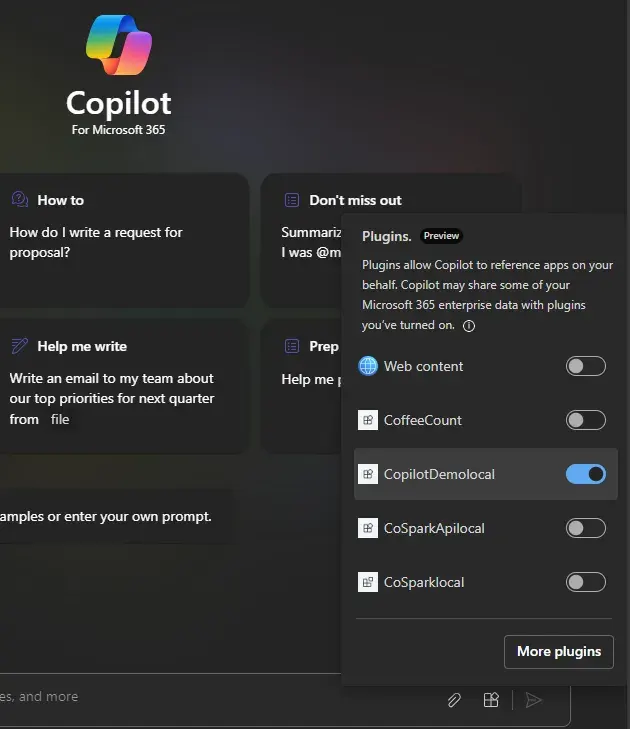
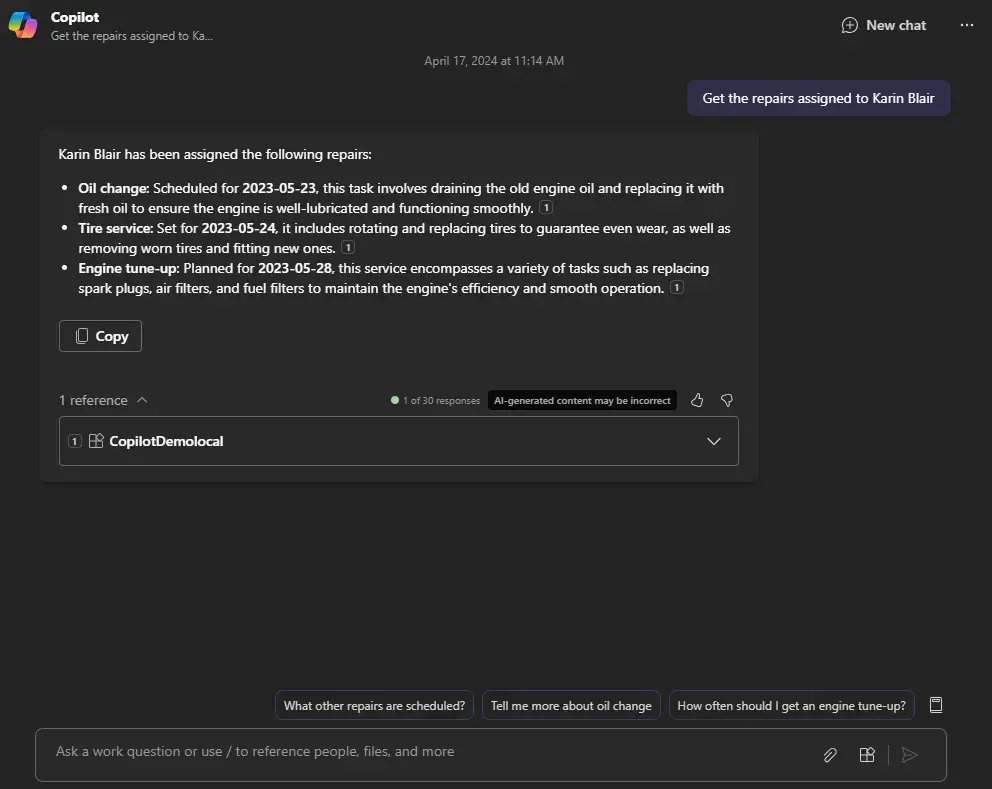
Now we can start a conversation with Copilot and provide a prompt. Copilot will evaluate the prompt and will decide if it needs to call the Function app or not. That’s why it is important to have good descriptions in the OpenAPI specification.
Conclusion
That’s it! We have successfully created a custom plugin for 365 Copilot. We used the OpenAPI specification of an API to generate a plugin that can be used in Copilot. This is a great way to extend the capabilities of Copilot and make it work for your company’s APIs. I hope this post was helpful and that you can now start building your own custom plugins for Copilot.
Some gotchas

Not everything went as smooth as I described in this post. Here are some things I ran into while running the plugin:
Plugin not showing up in Teams client
- Try to restart the project a couple of times.
- Make sure you have the necessary permissions to upload custom apps to your Teams client.
Copilot doesn’t trigger the plugin
- Try to provide a prompt that matches the descriptions in the OpenAPI specification
- Play around with the descriptions in the OpenAPI specification to see if that helps.
Be sure to restart the project after changing the OpenAPI specification!
Receiving only errors but no request made to your function
- There is a good chance that the OpenAPI specification contain things that Copilot cannot parse. Unfortunately there is no documentation which parts of the OpenAPI specification are not supported at the time of writing.
- Make sure the tunnel is accessible from the internet. Copilot needs to be able to reach your local environment.